小程序开发
从vue到小程序开发
教程:
1 数据绑定&事件绑定
数据
<view>{{text}}</view>                   // 绑定值
<image src="{{imgSrc}}" />      // 绑定属性
<view>{{no > 0 ? '大于': '小于'}}</view>    // 三元表达式
<view>{{random * 10}}</view>    // 算术表达式
事件
| 名称 | 描述 |
|---|---|
| tap | click |
| input | 输入 |
| change | 状态改变 |
<button bindtap="handleClick"}>点击</button>

Page({
  handleClick(){
    console.log('handleClick')
  }
})
事件传参
<button bindtap="handleClick"} data-info="{{2}}">点击</button>

Page({
  handleClick(event){
    console.log('[params]:', event.target.dataset.info);
    //=>> 2
  }
})
文本框更新示例
<input value="{{msg}}" bindinput="handleInput"}>点击</button>

Page({
  data: {
    msg: '',
  },
  handleInput(event){
    console.log('[value]:', event.detail.value);
    this.setData({
      msg: event.detail.value
    })
  }
})
问:this.setData会更新所有data对象的值吗?还是只更新msg的值?
2 条件渲染&列表渲染
条件
<block hidden="{{true}}">我将被隐藏,但会创建dom</block>
<block wx:if="{{false}}">我将被隐藏,且不会创建dom</block>
列表
<view wx:for="{{items}}"} wx:key="{{item.id}}">
    {{index}}-{{item}}  // 默认索引变量为index,item为值
</view>

Page({
  data: {
    items: [1, 2, 3]
  }
})
wx:for-index可以改变默认索引变量名wx-for-item可以改变默认值变量名
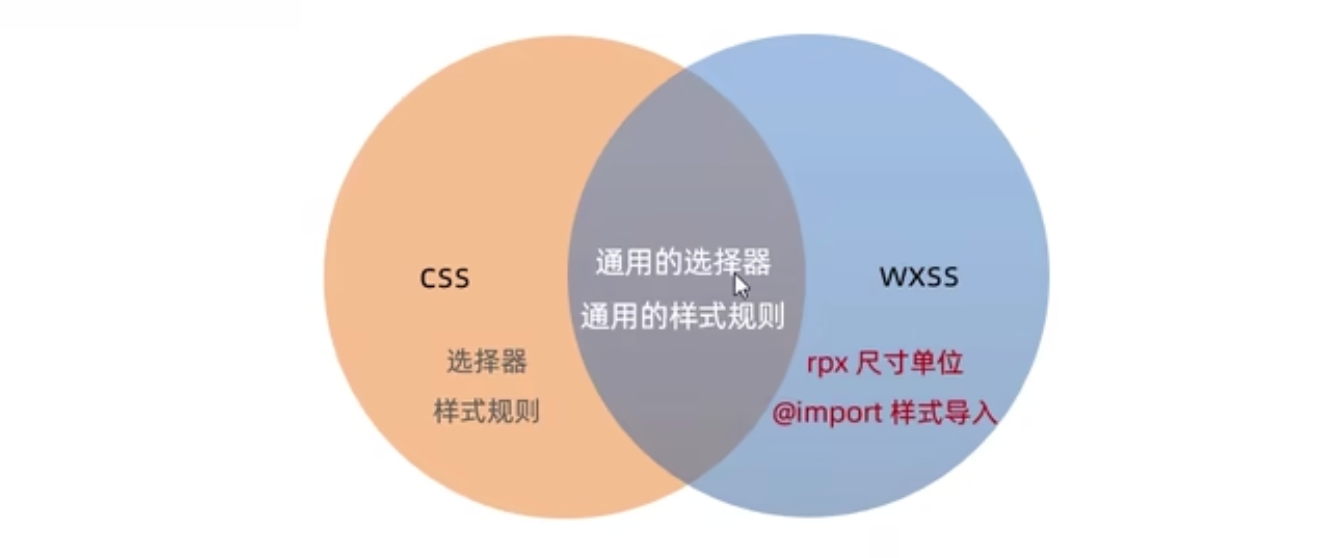
3 wxss
4 配置
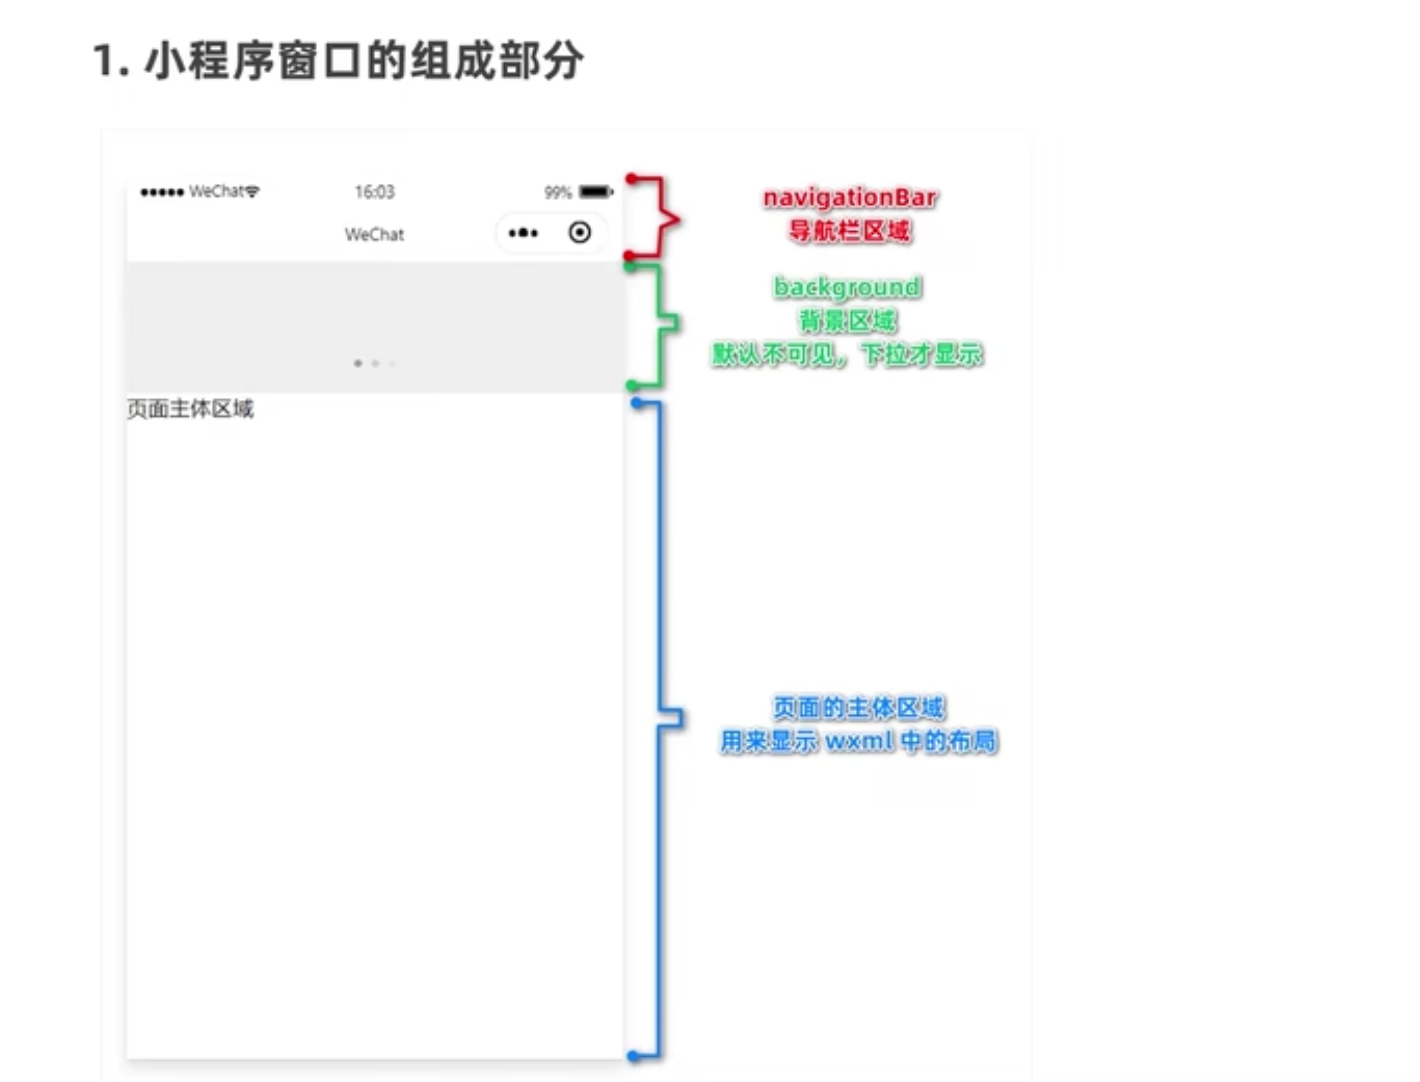
window可以配置导航区、背景区
5 页面导航|路由
组件
<navigator url="/home" open-type="navigate">首页</navigator>
<navigator open-type="navigateBack" delta="{{1}}">后退一层</navigator>
逻辑
wx.navigateTo({
  url: '',
  success: () => void 0,
  fail: () => void 0,
  complete: () => void 0,
})
// 后退
wx.navigateBack({
  delta: 1,
})

// 重定向
wx.redirect({
  url: '',
})
获取当前路由
const pages = getCurrentPages();

const currentPage = pages[pages.length - 1];
const url = `/${currentPage.route}`;
https://developers.weixin.qq.com/miniprogram/dev/reference/api/getCurrentPages.html
6 下拉刷新和上拉触底
两步:1.设置中开启 2.声明周期函数
7 WXS
但有computed,所以wxs可不用
WXML中无法调用js函数,而wxs就是解决该问题的,但wxs是类js语言,与js环境隔离,一般用做 过滤器
内联wxs
// app.wxml

<view>{{m1.toUpper(username)}}</view>
//=>> ZHANGSAN

<wxs module="m1">
  module.exports.toUpper = function(str){
    return str.toUpper();
  }
</wxs>

Page({
  data: {
    username: 'zhangsan'
  }
});
外联wxs
// m1.wxs
module.exports.toUpper = function(str){
  return str.toUpper();
}

// app.wxml
<view>{{m1.toUpper(username)}}</view>
<wxs src="./m1.wxs" module="m1" />
8 自定义组件
// header.json
{
  "component": true,
  "usingComponents" : {}
}

// header.js
Component({
  data: {},
  methods: {
    handleClick(){},    // 组件处理函数必须放到methods中
    _getName(){},           // 建议自定义方法以_开头
  },
})
使用组件:1.在.json中注册组件(全局|局部) 2.使用
// home.json
{
  "usingComponents" : {
    "header": "/components/header/header"
  }
}

// home.wxml
<header />
组件样式
组件间样式是隔离的
app.wxss全局样式的类选择器对组件无效,但id选择器、属性选择器、标签选择器有效
所以建议只使用类选择器
外部样式类
枚举外部可以使用的类样式
Props
// header.js
Component({
  properties: {
    max: Number,    // Number|String|Boolean
    max: {
      type: Number,
      value: 0,     // 缺省值
    }
  },
  methods: {
    handleClick() {
      console.log("[最大值]:", this.properties.max);
    }
  }
})

<header max="{{100}}" />
监听Watch
// header.js
Component({
  data: {
    firstName: '',
    lastName: '',
    fullName: '',
  },
  observers: {
    'firstName, lastName': function(newValueA, newValueB) {
      this.setData({
        fullName: newValueA + newValueB
      })
    }

    // 还支持对象属性监听
    'obj.a, obj.b': function(newValueA, newValueB) {
      this.setData({
        fullName: newValueA + newValueB
      })
    }
  },
  methods: {
    handleClick(){
      this.setData({
        firstName: 'san',
        lastName: 'zhang'
      })
      //=>> fullName:zhangsan
    }
  }
})
computed
[1][computed](https://github.com/wechat-miniprogram/computed)
组件中设置页面声明周期监听
// header.js
Component({
  pageLifetimes:{
    show(){} // show|hide|resize
  }
})
插槽
// nav.wxml
<view>
  <slot name="left"></slot>
  <slot></slot> // 默认插槽
  <slot name="right"></slot>
</view>

// app.wxml
<nav>
  <view slot="left">左边插槽</view>
  <view slot="right">右边插槽</view>
</nav>
父子组件通讯
- Props
- 事件
- 拿到实例(不推荐)
事件
// nav.js
Component({
  created() {
    this.triggerEvent('dismiss', {value: '123'})
  }
})

// app.wxml
<nav bind:dismiss="handleDismiss" />

  Page({
  handleDismiss(e) {
    console.log('[params]:', e.detail.value)
    //=>> '123'
  }
})
Behaviors
与vue的mixins类似
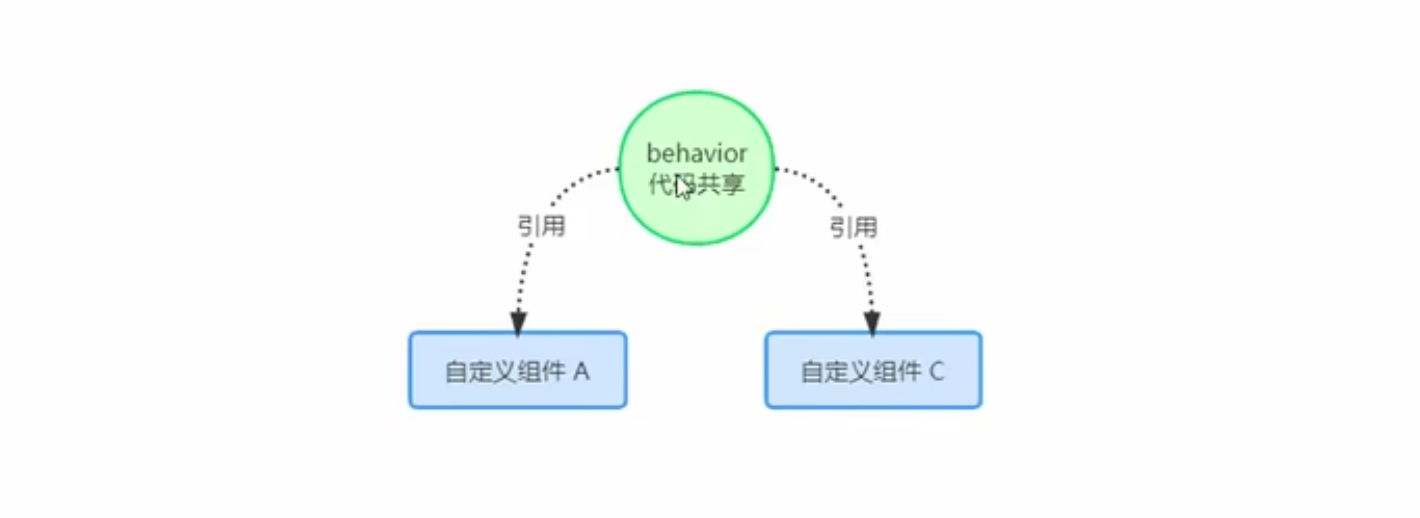
每个behaviors的属性、数据、声明周期、方法与组件混合在一起
9 npm包
小程序npm包限制:
- 不能有node内置库
- 不能有浏览器内置对象
- 不能有c++插件
10 Vant定制主题
在app.wxss中定义css变量
page {
  --button-danger-background-color: #ff00ff;
}
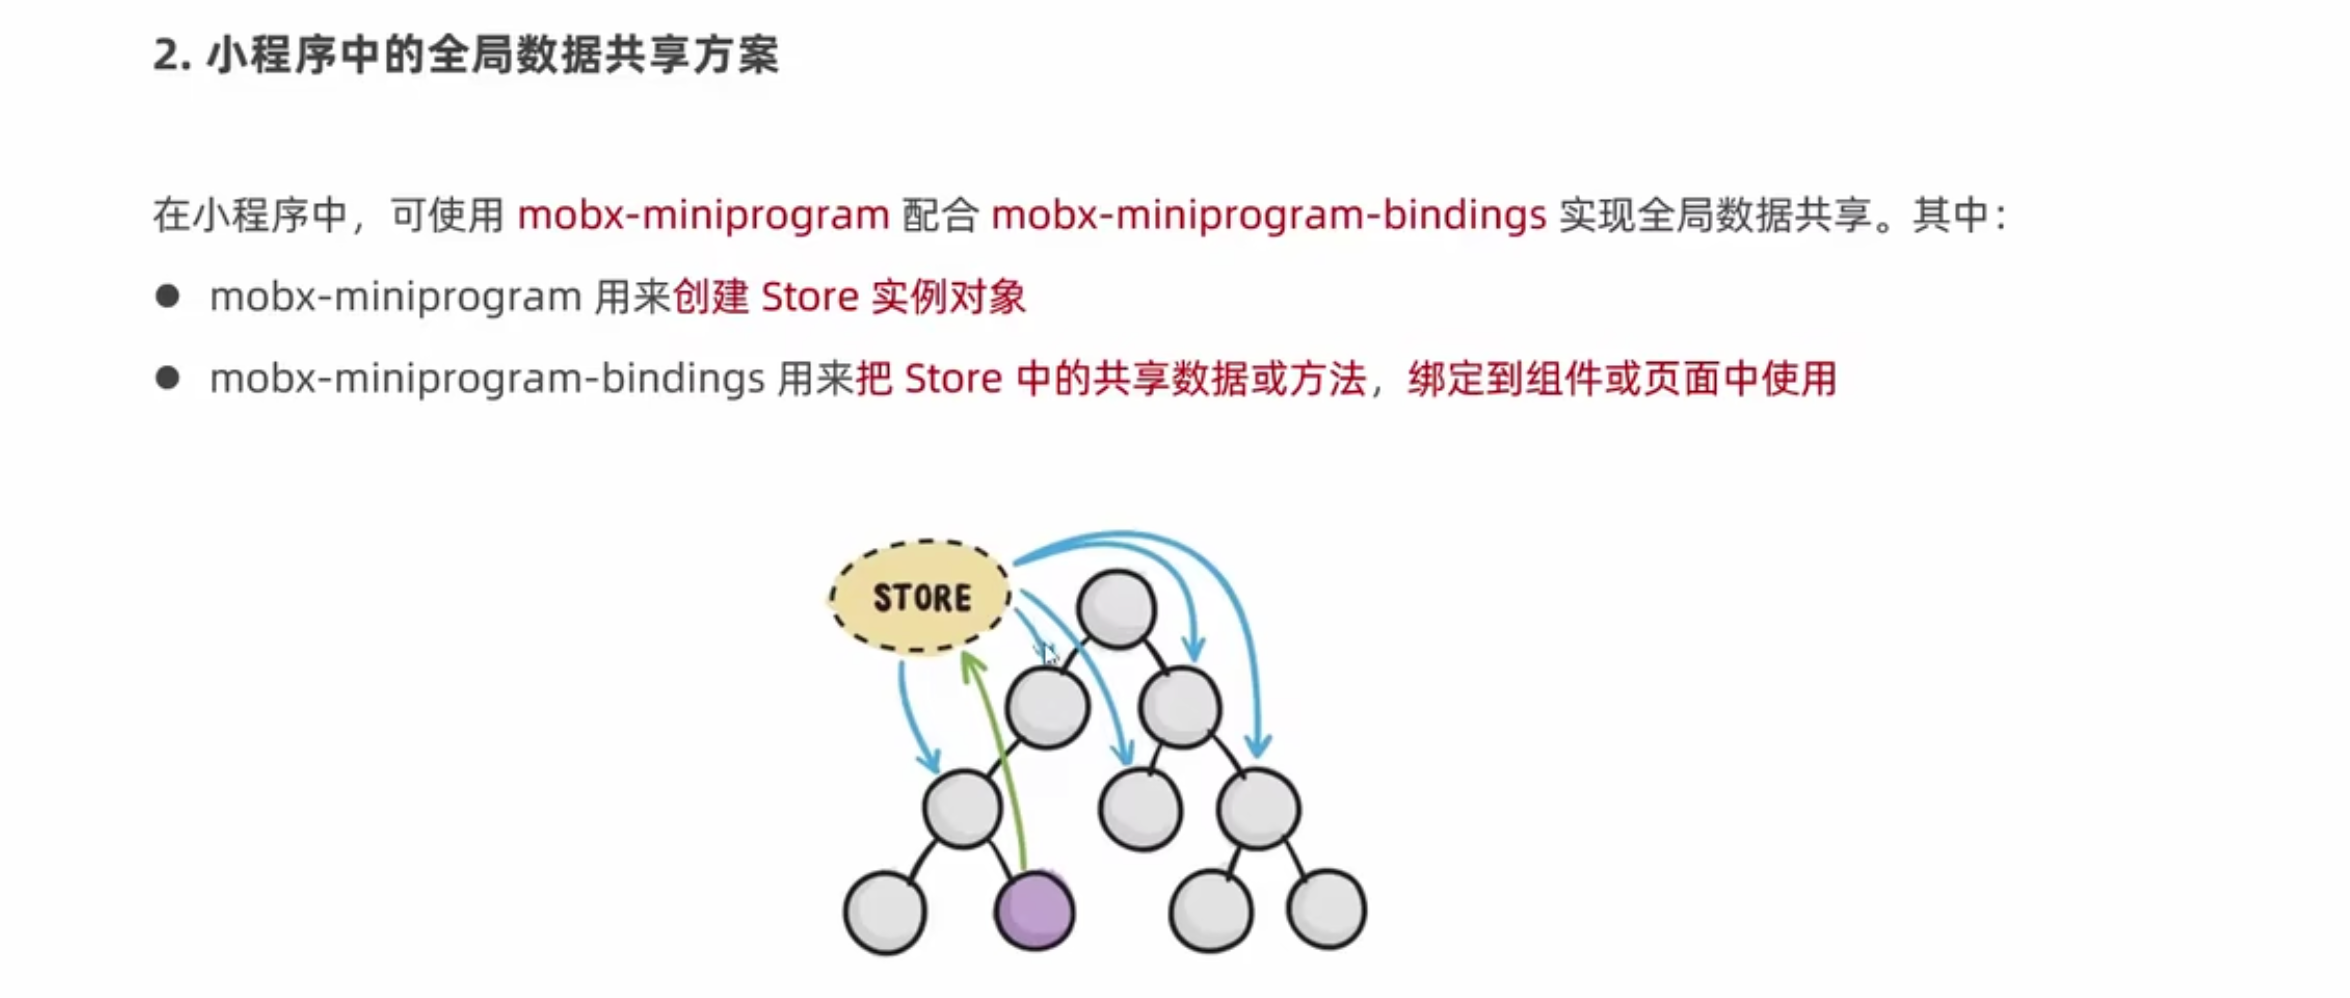
11 状态管理
安装npm包后,删除mini...program目录后,再构建npm
12 结合TS
12.1 标注事件类型
handleChange(event: WechatMiniprogram.BaseEvent) {
  ...
},
13 引入字体&字体图标
整体步骤:1.选中资源转base64 2.引入项目中
阿里图标库图标
[2][微信小程序引入iconfont单色图标实例(Font class方式)](https://blog.csdn.net/gyueh/article/details/119786184)
[3] 微信小程序 引入字体图标 字体 使用base64解决字体请求问题
14 小程序表单验证
we-validator可以结合vant组件进行表单验证+提示
[1][we-validator](https://github.com/ChanceYu/we-validator)
15 一些实用组件和实用功能实现方式
15.0 第三方实用组件和功能集合
使用vant组件库
几十种小程序示例demo(源码来自github)
15.1 原生小程序实现tooltips提示信息
<view class="my-tooltip-root" bindtap="clickTips">
  <view class="tips {{ isNeedTips ? 'visible' : 'hidden' }} {{ placement }}" style="width: {{ tooltipWidth + 'rpx' }}; left: {{-(tooltipWidth / 2) + 'rpx'}}">
    <slot name="tips" />
  </view>
  <slot />
</view>
@import '../../styles/index.scss';

.my-tooltip-root {
  position: relative;

  .tips {
    position: absolute;
    background-color: var(--bg1);
    top: 22px;
    display: flex;
    padding: 6px 10px;
    border-radius: 8px;
    -webkit-border-radius: 8px;
    -moz-border-radius: 8px;
    -ms-border-radius: 8px;
    -o-border-radius: 8px;
  }
  .tips::after {
    content: '';
    position: absolute;
    top: -4px;
    left: 50%;
    display: block;
    width: 0;
    height: 0;
    border-radius: 4px;
    border: 8px solid transparent;
    border-right-color: var(--bg1);
    border-bottom-color: var(--bg1);
    transform: translateX(-50%) scaleX(0.8) rotate(225deg);
    -webkit-transform: translateX(-50%) scaleX(0.8) rotate(225deg);
    -moz-transform: translateX(-50%) scaleX(0.8) rotate(225deg);
    -ms-transform: translateX(-50%) scaleX(0.8) rotate(225deg);
    -o-transform: translateX(-50%) scaleX(0.8) rotate(225deg);
    -webkit-border-radius: 4px;
    -moz-border-radius: 4px;
    -ms-border-radius: 4px;
    -o-border-radius: 4px;
  }
  .visible {
    display: block;
  }
  .hidden {
    display: none;
  }
}
const screenWidth = wx.getSystemInfoSync().windowWidth // 获取设备信息(宽度)

// page
Component({
  options: {
    addGlobalClass: true,
    multipleSlots: true,
  },
  externalClasses: ['my-class'],
  properties: {
    placement: {
      type: String,
      value: 'top', // right bottom left
    },
    maxWidth: {
      type: Number,
      value: 354,
    },
    tipsWidth: {
      type: Number,
      value: 200,
    },
    duration: {
      type: Number,
      value: 2000,
    },
  },
  data: {
    tooltipWidth: 100,
    isNeedTips: false,
  },
  lifetimes: {
    attached() {
      setTimeout(() => {
        this.getTooltipWidth()
        this.judgePosition()
      }, 0)
    },
  },
  methods: {
    getTooltipWidth() {
      const contentRPXWidth = this.data.tipsWidth // 自定义的一个tips宽度
      const conetntPXWidth = (contentRPXWidth / 750) * screenWidth // 根据屏幕适配的宽度
      this.createSelectorQuery()
        .select('.my-tooltip-root')
        .boundingClientRect((res) => {
        const { width } = res

        const { maxWidth } = this.data

        let tooltipWidth = 0
        // 获取自定义元素的宽度 与 屏幕适配宽度做比较
        // 最终参考使用一个合适的宽度作为 tips 的宽度
        if (conetntPXWidth < width) {
          tooltipWidth = contentRPXWidth
        } else {
          tooltipWidth = contentRPXWidth < maxWidth ? contentRPXWidth : maxWidth
        }

        this.setData({
          tooltipWidth,
        })
      })
        .exec()
    },
    // 判断tips是否在某个位置上有足够的空间放置
    judgePosition() {
      // 同理通过 wx.createSelectorQuery().in(this).select('').boundingClientRect去获取自定义元素的位置元素信息以及tips的位置元素信息去做处理
      // 在这里只列举了其中一种情况的例子进行判断来设置该tips的实际放置位置
      // 以下情况可能出现的场景是:自定义元素放置的位置过于偏左 导致上下的tips没办法放置 因此设置tips到右边 别的情况同理
      const tipWidth = this.data.tooltipWidth
      const targetLeft = 0
      const targetWidth = 50

      if (this.data.placement === 'top' || this.data.placement === 'bottom') {
        const targetLeftCenter = targetLeft + targetWidth / 2 // 点击元素的中间位置坐标
        if (targetLeftCenter < tipWidth / 2) {
          this.setData({
            placement: 'right',
          })
        }
      }
    },
    clickTips() {
      const { duration } = this.data
      this.setData({ isNeedTips: true }) // 显示tips

      let timer: number | null = setTimeout(() => {
        this.setData({
          isNeedTips: false, // 在duration毫秒后隐藏tips
        })
        wx.nextTick(() => {
          if (timer) {
            clearTimeout(timer) // 清理定时器
            timer = null
          }
        })
      }, duration)

      this.triggerEvent('click') // 抛出一个点击事件
    },
  },
})
[1][原生小程序实现tooltips提示信息](https://juejin.cn/post/7012301682977538079)
15.2 小程序自定义相机
<!-- scan.wxml -->
<view class="root-scan scan-view">
  <view class="scan-border">
    <camera wx:if="{{showCamera}}" class="{{!showCamera ?'scan-camera__camera-hidden': 'scan-camera'}}" mode="scanCode" bind:error="handleCameraError" bind:scancode="handleScanCode" frame-size="large">
      <view class="scan-animation row" animation="{{animation}}">
        <view class="scan-animation_view" />
      </view>
    </camera>
    <view class="wrap-content__cover">
      <slot name="bottom" />
    </view>
  </view>
  <!-- 弹出层 -->
  <van-popup round position="{{position}}" show="{{ show }}" close-on-click-overlay="{{false}}" closeable bind:close="handleClose">
    <slot name="popup" />
  </van-popup>
</view>
自定义相机优缺点:
- 优点
- 可以在相机上自定义样式
- 缺点
- 卡顿,性能以及流畅度没有 wx.scanCode 好
[1][wx.scanCode(Object object)](https://developers.weixin.qq.com/miniprogram/dev/api/device/scan/wx.scanCode.html)
15.3 微信小程序蓝牙对接热敏打印机
[1][微信小程序蓝牙对接热敏打印机](https://blog.csdn.net/qq_37970097/article/details/119148707)
[2][miniprogram-bluetoothprinter](https://github.com/benioZhang/miniprogram-bluetoothprinter)
[3][微信小程序 蓝牙热敏打印 标签打印机](https://gitee.com/techer_li/wechat_print)
15.4 微信小程序隐藏scroll-view的滚动条
::-webkit-scrollbar {
  display:none;
  width:0;
  height:0;
  color:transparent;
}
[1] https://blog.csdn.net/m0_46156566/article/details/120696699
[2][微信小程序如何隐藏scroll-view滚动条](https://developers.weixin.qq.com/community/develop/doc/00006473cf08f8c29da606b2d56c00)
15.5 如何让 scroll-view 填充剩余空间
TODO
[1][scroll-view](https://developers.weixin.qq.com/miniprogram/dev/component/scroll-view.html)
15.6 微信小程序上传图片
import { UPLOAD_URL } from '../env/index'
import { HttpResponseBaseSync } from './api'

type Options = {
  type: 'sign' | 'perfect' | 'fail' | 'other'
  success?: (data: HttpResponseBaseSync<UploadRes[]>) => void
  fail?: (err: any) => void
}

type UploadRes = {
  destination: string
}

function upload(file: any, { success, fail, type }: Options) {
  const token = wx.getStorageSync('token')

  const url = (UPLOAD_URL as any)[type]

  // 当设置 mutiple 为 true 时, file 为数组格式,否则为对象格式
  wx.uploadFile({
    url,
    filePath: file.url,
    header: {
      Authorization: `Bearer ${token}`,
    },
    name: 'file',
    success(res) {
      const data: HttpResponseBaseSync<UploadRes[]> = JSON.parse(res.data)
      success && success(data)
    },
    fail,
  })
}

export { upload }
[1][wx.uploadFile(Object object)](https://developers.weixin.qq.com/miniprogram/dev/api/network/upload/wx.uploadFile.html)
16 格式化
16.1 Prettier格式化微信小程序
几点注意:
- 用vscode时,要注意代码是prettier格式化还是其他工具在格式化,否则会导致 prettier 命令行和vscode自动保存代码格式不一致的问题
- prettier无法格式wxml、wxss,需要配置,但wxml有自己的格式化插件 XML Language Server
prettier配置示例:
module.exports = {
  singleQuote: true,
  tabWidth: 2,
  useTabs: false,
  semi: false,
  trailingComma: 'all',
  printWidth: 120,
  endOfLine: 'auto',

  // 识别wxss wxml
  overrides: [
    {
      files: ['*.wxss', '*.acss'],
      options: {
        parser: 'css',
      },
    },
    {
      files: ['*.wxml', '*.axml'],
      options: {
        parser: 'html',
      },
    },
    {
      files: ['*.wxs', '*.sjs'],
      options: {
        parser: 'babel',
      },
    },
  ],
}
eslint配置示例:
module.exports = {
  root: true,
  env: {
    es6: true,
    browser: true,
    node: true,
  },
  extends: ['eslint:recommended'],
  parser: '@babel/eslint-parser',
  parserOptions: {
    ecmaVersion: 2018,
    sourceType: 'module',
    requireConfigFile: false,
    ecmaFeatures: {
      // lambda表达式
      arrowFunctions: true,
      // 解构赋值
      destructuring: true,
      // class
      classes: true,
    },
  },
  globals: {
    wx: true,
    App: true,
    Page: true,
    getCurrentPages: true,
    getApp: true,
    Component: true,
    requirePlugin: true,
    requireMiniProgram: true,
  },
  rules: {
    'no-unused-vars': 'warn',
    'no-useless-escape': 'warn',
  },
}
命令:
{
  "lint": "eslint \"miniprogram/{pages,components,templates,styles,utils,test,env}/**/*.{js,ts}\" --fix",
  "format": "prettier --config ./.prettierrc.js --write \"miniprogram/{pages,components,templates,styles,utils,test,env}/**/*.{js,ts,wxss}\"",
  "format:check": "prettier --config ./.prettierrc.js --check \"miniprogram/{pages,components,templates,styles,utils,test,env}/**/*.{js,ts,wxss}\""
}
[1][微信小程序集成 ESLint + Preitter 插件](https://juejin.cn/post/7051440695139106847)